Showing posts with label Tutorial. Show all posts

Wednesday, October 23, 2013

DIY Fall Bottles

Need an easy DIY Fall Home Decor idea?  Have someone willing to save their beer bottles for you?  Well, this one is for you.  Thanks to my (seems like) endless supply of hemp/twine/jute...whatever you want to call it... and my man's love for Red Stripe Beer (you know, the ones that look like medicine bottles?) I've been able to do a couple projects like this!  This is for my sister's house.

Lets get started!

Thursday, February 7, 2013

Soaping! Hot Process

The art of soap making has taken over my life! Every bit of time off I get, I've been putting towards soap making. It's so much fun!


Recently, I've starting making soap from scratch using the Hot Process method.  I got the inspiration (and tutorial) from Suzanne at her blog, Chickens in the Road. I like the idea of a less curing time that goes with this process compared to the 4-6 week wait for the cold process soap! I also love the "homemade" and "rustic" look that the hot process gives the soap. However, you can definitely do more with cold process soap when it comes to decorating and designing the soaps.


I make my hot process soap with a crock pot. You can also use a double boiler, or even the oven. I just boogied on down to our town's thrift store and bought a large, heavy duty crock pot for CHEAP!


For Hot Process soap instructions, check out this blog, Chickens in the Road!


To check out all of my soaps, go to Soapisticated.etsy.com.


Here are some photos of a couple types of my Hot Process Soap, along with their ingredients, and a bit about the ingredients in the soap and what it can do for your skin.  


Enjoy!


Sage and Lemongrass HP Soap


Sunday, May 6, 2012

Coffee Corner Wall Art

MMMMM!!! COFFEE, COFFEE, COFFEE, COFFEE, COFFEE!! {Kinda like the commercial with the dog that's yelling BACON, BACON BACON!!! That's how I'd say it.} I don't know how anyone couldn't like the smell of coffee.  Especially in the morning!! So delish.  {starting to drool}


Here is just another quick and easy wall update for Mom's shop! She has a cute little corner area where she puts all of her coffee, tea, and fixins' which needed some decor. Momma loves her coffee!!


Again, I just used my cricut to cut out all of the letters and also the coffee cup decor. I then hung them up with some more sticky tack just like I did with my other wall decal post.


Mom's shop walls are pretty bare so just this little bit definitely goes a long way. Cheers the place up a bit! Nobody wants to work in a dull setting.


Just writing this made me have a coffee craving Gotta go have a cup NOW!!  Mouth is watering.

Thursday, April 26, 2012

Wall decals? Nope!!

My Mom has a commercial print shop which needed a little something. She had a great big, bare, white wall that was screaming for color. Since Mom's favorite color is purple, I decided that needed to be the focal spot of color. This was MUCH easier than dealing with wall decals...trying to put them on level and pealing without ripping, etc.


I'm pretty impressed with how this came out, especially when it was a last-second idea, two hours before I went on call. And because my mom owns a printing shop, I had everything I needed to complete it. So all it costed me was a couple hours of time {can't beat that!!!}.
The one foot "love" letters were made out of cardboard and wrapped in purple scrapbooking paper. I just sketched them myself and cut them out with scissors. Mom had some thinner, black cardboard that I used for the smaller letters which are four inches. I used my cricut to cut out those letters. You wouldn't have to use cardboard, index or thick scrapbooking paper would have worked fine. I was just being selfish and didn't want to use a lot of my scrapbook supplies
Then I found some handy dandy fun tact/sticky tack/the whatever you want to call stretchy smushy stuff, and hung the letters up with that. I just eyeballed the levelness of each letter and prayed they wouldn't be going uphill. Fortunately, I didn't even have to change anything around {I never get that lucky}!!
How's that for a two hour DIY bare wall enhancement? I say, not too shabby.
Lillie


Sunday, March 25, 2012

Jordan Almond Easter Decor


Ahhhh, the ideas that pinterest gives me! Yes, I stole this concept from pinterest, however instead of making a wreath, I made Easter Trees!

Wednesday, March 14, 2012

Simple Kitchen Art

So easy, simple, and CHEAP {I'm all about saving money}!!  I already had the canvas and spray paint for them, all I needed were some short kitchen accessories.  Found the two small wooden spoons at a second hand store for the huge price of $0.50!!  Yup, a whole whopping 25 cents each.  I spray painted them with an ivory color.  I also spray painted the two canvases {...canvi? canvases doesn't sound right} to go with our tangerine and green kitchen {walls are tangerine, so we needed more green accents}.  After each dried, I hot glued the wooden spoons on and just leaned both against the wall behind our stove.

Little did I know that the spray paint color I already had matched almost perfectly with the Tea Pot!
We love it!


Tuesday, February 28, 2012

Spray Painted Clothes Pins

Yay for making laundry more fun!!!!! {HA}

Saw this idea HERE via Pinterest.  I absolutely LOVED the vintage color scheme that she had!  I decided to not copy {for once} and came up with my own melon-y color scheme.  


I just spray painted each side of the clothes pins and let dry!  They really do brighten up the laundry room a bit.  I'm hoping it does the same to the actual "doing" of the laundry. :)

Crackle Paint Frames

I've had the crackle paint and two wooden pictures frames for quite a while.  I decided I should just put two and two together and see how it would work!

Monday, February 27, 2012

Bumble Bee 1st Birthday


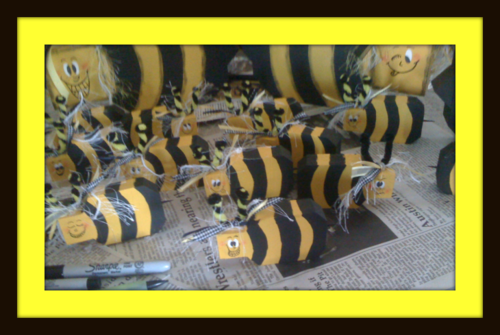
I just realized I hadn't posted this on here yet!  Heck, we're already starting to get things together for my niece's 2nd Birthday in May.  Anyways, here is what we did for her 1st Birthday! :)

I made these adorable bumble bees out of scrap wood and a little bit of paint for my niece Hailey’s first birthday in May!  We used the large ones as table center pieces and the smaller ones for each person’s place setting.

Sunday, February 19, 2012

Bottle Cap Magnets

As I was sitting at work, looking busy of course, browsing a handful of DIY craft blogs {this was before they weren't monitoring internet usage...sadly we cannot browse anymore}, I came across a fun idea.  (Sorry, don’t remember the source, however you can search how to do this on youtube)  BOTTLE CAP MAGNETS!! They’re super cute and fun.  There are so many designs, themes, colors, etc you can dress them up with.  My mom does digital scrapbooking, so I used a bunch of images from her digital scrapbooking supplies to print out and use on my bottle caps.  You can also use decorative scrapbook paper.  Just punch them out with a 1” hole punch!  Here are just a few I’ve made… 


I'm in love with my coffee magnets.  They are my fav so far!

Sunday, January 29, 2012

Crayon Letter Art


I made this cute “H” out of crayons for my 17 month old niece Hailey (who is the cutest little girl in the world) in under an hour!  Soooo easy.
The tutorial for this project is from The Trendy Treehouse.  Just click HERE!!.

CD Case Wall Art


This site inspired me to do this project.  They have a very helpful video!
For some simple instructions…READ MORE!! :) :)

Thursday, December 8, 2011

Burnt Out Christmas Lights into Cute Sparkly Centerpiece!


This is simply brilliant.  It turned out way better than originally planned.   This honestly took me less than an hour to finish!  DO IT!!!!  You won't be sorry!  Recycling is ALWAYS good!

Easy Ripple Afghan and Grannie Ripple Afghan

Ok ok, I confess, I started both of these last year...or longer, and still haven't finished them yet.  OOPS!! Maybe this year they'll get done...? :)

The black and white afghan is an Easy Ripple stitch, the pattern is HERE.

The colorful afghan is a Grannie Ripple stitch.  Go HERE for an awesome video tutorial for this afghan.

Guess I should get to crocheting...it't that time of year! 

Happy crocheting <3

Spiral Scrubbies!-Crochet


Click HERE for the video tutorial for this Spiral Scrubbie!  The pattern for this project is HERE.  

I used acrylic yarn (to make it rougher to wash dishes) in a fall color scheme for the season.  It seriously only took me 30 minutes or less to make.  It's really thick and durable for dish washing.  Another option is to use cotton yarn, or any other soft yarn, and use the scrubbie in the shower/bath!


Enjoy! :)